


 Recording
stops after the time you specified int he Length field has elapsed. You
can stop the recording process yourself by hitting the '.' key while holding
down the Apple or Command key.
Recording
stops after the time you specified int he Length field has elapsed. You
can stop the recording process yourself by hitting the '.' key while holding
down the Apple or Command key.


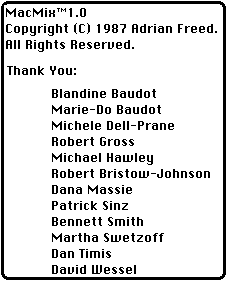
- David Wessel’s IRCAM
- Organized Entanglement: Fiber and Textile Arts, Science and Engineering
- Managing Complexity with Explicit Mapping of Gestures to Sound Control with OSC
- Notations for Performative Electronics: the case of the CMOS Varactor
- A Synthesizable Hybrid VCO using SkyWater 130nm Standard-Cell Multiplexers
- A Recipe using OSC Messages
- Birds of the East Bay 2020
- Exercising the odot language in Graphics Animation Applications
- C++ container output stream header file
- Programming
MacMix Manual
Sun, 07/04/2010 - 15:49 — AdrianFreed
| Title | MacMix Manual |
| Publication Type | Book |
| Year of Publication | 1987 |
| Authors | Freed, Adrian |
| Abstract | By combining Dyaxis convertors and MacMix with a Macintosh computer, you have created a powerful self-contained digital audio workstation. The Dyaxis convertors allow you to record sounds on Macintosh hard disks and then play them back. MacMix processes sounds on hard disks and controls Dyaxis operations. You can edit, mix and process stored sounds with great precision and flexibility. If you have already used Macintosh applications such as MacPaint(TM) and MacWrite(TM), you will find few surprises in MacMix. The program works like a word processor for sounds. |
| Full Text | MacMix Manual©1987 Adrian Freed. All Rights Reserved.A Digital Audio WorkstationBy combining Dyaxis convertors and MacMix with a Macintosh computer, you have created a powerful self-contained digital audio workstation.
The Dyaxis convertors allow you to record sounds on Macintosh hard disks and then play them back. MacMix processes sounds on hard disks and controls Dyaxis operations. You can edit, mix and process stored sounds with great precision and flexibility. About the ManualIntroductionIf you have already used Macintosh applications such as MacPaint(TM) and MacWrite(TM), you will find few surprises in MacMix. The program works like a word processor for sounds.
You will use MacMix to manipulate sounds stored digitally as Macintosh files. If you are new to the Macintosh, you will find it fruitful to read the manual on the machine itself and experiment until you are comfortable with the mouse and the way files are manipulated. The glossary at the end of this manual covers computer and Macintosh terminology.
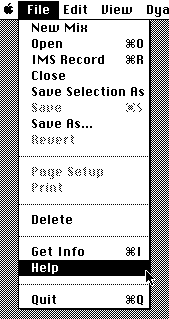
If reading manuals is not your cup of tea, you can plunge in and learn how to use MacMix by experimentation. MacMix has an extensive context senstive on-line help facility. You can learn how to use it by launching the application and selecting Help in the File menu. Starting MacMixInstalling the HardwareConnect your Macintosh, hard disk and Dyaxis as described in the Dyaxis manual. Launching MacMixInsert the MacMix distribution disk in the floppy drive. Copy the MacMix program to a hard disk, by dragging the application icon, a mixing console, to the hard disk icon. Keep the MacMix distribution disk somewhere safe as a backup.
Launch the copy on hard disk by double-clicking the MacMix icon. Sweep the mouse cursor across the menu bar to familiarize yourself with the menu names and functions:
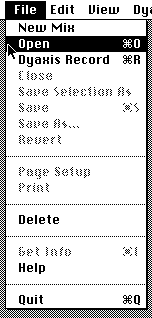
Recording
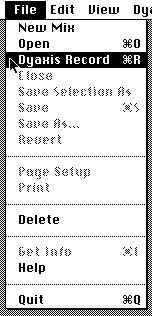
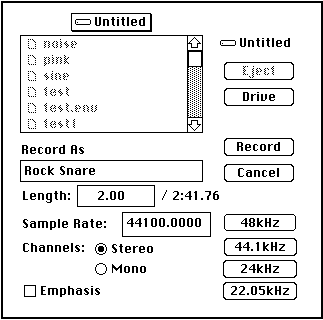
Select Dyaxis Record in the File menu. The record dialog box will appear:
Record AsFill out the Record As field with the name you want to use to refer to the sound. The record dialogue box contains the standard facilities for choosing a disk drive and selecting a folder for your file. Make sure you have selected an IMS approved disk drive for recording. Record LengthFill out the Length field with the maximum length of the sound you are to record. The time displayed after this field tells you how much free space is left on the disk. Time is entered and displayed with colons separating hours, minutes and seconds. Here are some examples of ways time can be entered: 1:10:3.5 1 hour 10 minutes and 3.5 seconds 5:3 5 minutes 3 seconds 100 1 minute 40 seconds Sampling RateYou specify the sampling rate either by clicking one of the buttons with the four standard sample rates, or by typing a value into the Sample Rate field. The Dyaxis convertors contain high quality filters which are used for the standard sample rates and lower quality filters for other sample rates. Stereo or MonoYou have the option of recording stereophonic or monophonic sounds. If your source material is monophonic, send it to the left channel of Dyaxis and click on the Mono button. An advantage of using mono files is that they take up half as much space and can be processed twice as fast as stereo files. EmphasisCheck the Emphasis box if you are doing a direct digital dub from a source which uses emphasis filters, such as a compact disk or Sony PCM1610/1630. Starting Recording
When you are ready to record, click on the Record button; The mouse cursor changes to an icon representing a finger poised on the mouse button. Recording is paused while you cue the sound source.
Cue up the sound source and click the mouse button. The mouse cursor changes to an icon representing a microphone, to tell you that recording is in progress.
The disk use light flashes as the Dyaxis convertors write the digital representation of the recorded sound directly to disk.
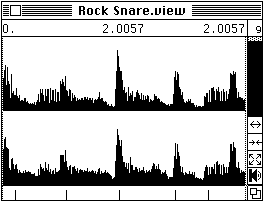
ViewingIntroductionIdentifying sound segments is central to editing, mixing and processing. This chapter covers the facilities available for exploring sounds and identifying segments.
Sound View Window
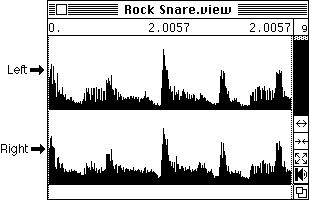
When recording successfully finishes, a "view window" is created.
If your recording is longer than about a second, no graphical representation of it appears in the window:
To see the graphical representation of your sound, select the Make Permanent Display option of the View menu. This process may take some time, but you only have to do it once for each new sound you record to disk. A waveform will appear when the display computation finishes.
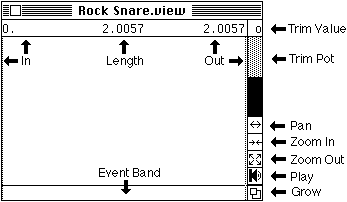
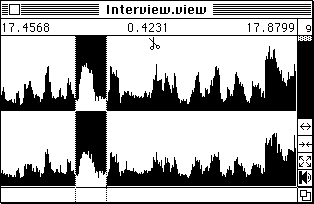
Selecting Sound SegmentsThe horizontal axis represents time. The vertical axis represents amplitude. The left and right dotted line cursors are used for identifying sound segments. They are like the "head" and "tail" of a piece of magnetic tape or the "in" and "out" points in video editing. The cursors are moved by clicking with the cursor in the event band of a window. This is the rectangular area under the sound samples. You can move one cursor at a time. Click near the one you want to move. You can specify both points in single gesture by holding down the shift key while you click and drag. Exploring SoundWhen a sound is first displayed, you see a global view of the whole file. You see the overall amplitude envelope of the sound, but no fine detail.
If you want a more detailed look at part of a sound, increase the size of the window, by dragging the grow box at its bottom right hand corner. Zoom In
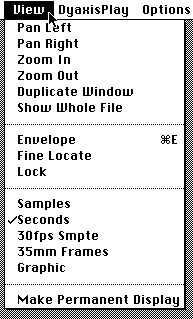
You can also choose to see smaller or larger segments of sound. This is done by positioning the cursors around the required segment and selecting one of the Zoom functions from the View menu.
When you select Zoom In, the waveform is redrawn so that the selected segment fills the window. You can repeat this process to see finer and finer detail until you see the samples themselves. Zoom OutWhen you select Zoom Out, the waveform is redrawn so that you see more of the sound. You can repeat this process until the whole file fills the view window. PanningUse the Pan Left and Pan Right functions in the View menu to pan horizontally over sounds. Each pan is one windows worth of sound. If you hear a beep when you pan it is because you have reached the sound's beginning or end. Navigation ShortcutsThe buttons with arrow icons are convenient shortcuts to the panning and zooming functions:
Pan Left and Right (click on left or right arrow)
Zoom In
Zoom Out Show Whole FileSelect Show Whole File in the View menu to have the view window display the entire sound file.
Segment TimesThe size and position of segments selected by the cursors is displayed underneath the window title. They change while you move the cursors. From left to right, you see the time from the beginning of the file to the left cursor, the time between cursors and the time from the beginning of the file to the right cursor.
You can select one of the following formats from the View menu:
3.3 Seconds 1:3:4-29 time code 3'7 film feet and frames 14590 samples
Zooming in Amplitude
Use the trim potentiometer in a view window to magnify or shrink your view of sample amplitudes. The trim potentiometer operates from -10 to +10dB, with 0dB (unity gain) in the center. The trim potentiometer currently only affects the graphical display of the sound. Fine LocationSelect Fine Locate in the View menu when you need very accurate positioning of the cursors. The graphical waveform display of the view window will be split into three parts. The bottom half of the window contains the original display. The upper left corner displays the samples just before the left cursor. The upper right corner displays the samples after the right cursor. Experiment by moving the cursors while observing the display.
One Sound - Many ViewsUse Duplicate Window in the View menu to create a copy of a view window. A dialog box appears so you can choose a name for the new window. You can duplicate as many times as you wish. Each new view window is completely independent of the others. You can use this facility in conjunction with the cursors to create many sound segments from a single sound recording. These segments will be used in future editing, mixing and processing operations.
Zoom In DuplicationA special form of window duplication is available as a shortcut. If you have the shift key down when selecting the Zoom In function, a new window is created which contains the selected segment of the old window. Audition
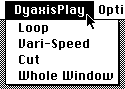
To listen to a sound segment identified by the cursors, click on the play button (an icon representing a loudspeaker). Hold down the command key while clicking to listen to everything displayed in a view window. Several different auditioning possibilities are available under the Play menu. Edit PreviewingCut plays the contents of the active window except for the segment currently selected by the cursors. A short cut for this menu operation is to hold down the shift key while clicking on the play icon. LoopingLoop repeats the currently selected sound until you release the mouse button. Vari-speedVari-speed plays the file at a speed controlled by the horizontal position of the mouse cursor. Slowest speeds are at the left of the screen. Stopping PlayYou may stop Play functions by striking the '.' key while holding down the Apple key. Most operations in MacMix may be stopped with this key combination. Logging CuesA small "time line" crawls or scurries across the event band during audition of sounds. The end of this band indicates the samples currently being played. During audition the Macintosh logs any clicks of the mouse button. After audition, these points in time are displayed as tic marks in the event band. Use this powerful and simple scheme for identifying points of interest for future editing mixing and processing operations.
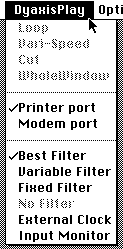
Dyaxis ConfigurationDyaxis Port Connections
The items below the first dotted line in the Dyaxis Play menu are used to configure the Dyaxis convertors. You can choose to connect your Macintosh to Dyaxis using the printer or modem ports. Whichever you choose, select the appropriate port in the Dyaxis Play menu.
Filter SelectionDyaxis has a medium quality variable frequency cut-off filter and high quality filters at fixed sample rates. MacMix uses the high quality filters whenever possible. Select Variable Filter or Fixed Filter in the Dyaxis Play menu if you want to force the use of a particular filter. External ClockSelect External Clock when using one of the Dyaxis clock synchronization options.
Input MonitorSelect Input Monitor to put Dyaxis in the input monitor mode. This has the same effect as pushing the monitor button on the Dyaxis front panel and is useful if Dyaxis is mounted some distance from your Macintosh.
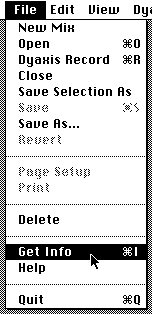
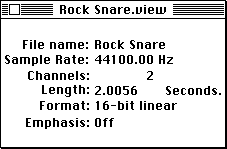
Getting Information
Sound files are made up of descriptive information and the sound samples themselves. Use the Get Info in the File menu to create a dialog box containing descriptive information including the sample rate, number of channels and sound length.
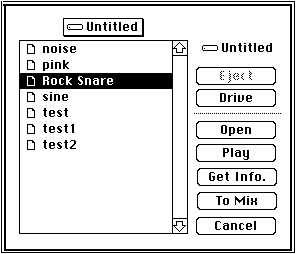
Opening Sounds
Select Open in the File menu. You will be prompted to choose from a list of files in the current folder. In addition to the standard Open button there are Play, and Get Info. buttons to help you browse through a library of sounds.
The To Mix button is explained in the mixing chapter. EditingReal time editingEdits do not destroy or rearrange any data in the original sound. Each time sounds are played, the Dyaxis convertors perform edits of the original in real-time. This is a big advantage of disk-based digital audio systems: you can change your mind without resplicing tape.
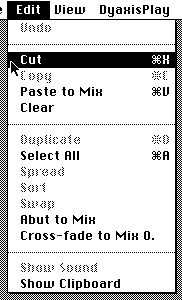
Drag the cursors to select part of a sound to be removed. Use Cut in the Dyaxis Play menu to preview the edit When you have identified the edit points, select Cut in the Edit menu. Notice that the waveform display changes: the edited piece is highlighted. Continue this process with as many edits as you need. If you create short edits and zoom out, it may be impossible to use highlighting to indicate edit points, so instead you will see a scissor icon.
To remove an edit, simply select part of it with the cursors and select Clear in the Edit menu. Save Selection AsSometimes you will create more edits than the disk drives can keep up with, in which case a warning message is displayed. Fortunately, there is a way of permanently committing to a set of edits, which does not require the disk to perform editing gymnastics. Use Save Selection As in the File menu is to extract a selected segment from a sound file and place it in a new file. A dialogue box prompts for the name of the new segment. The segment created is specified by the position of the cursors in the currently selected window. Mixing
Mix cue sheets are made inside "mix windows". Bring an empty mix window to life by selecting New Mix in the File menu. The mix dialog box appears:
Fill out the name of the file you would like sound to be mixed to. You can mix stereo or mono source sound segments to stereo or mono. The examples that follow are stereo mixes. For mono mixes choose 1 as the number of channels in the mix dialog box.
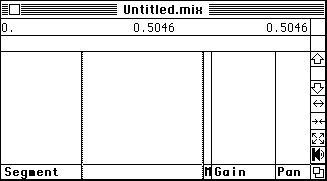
Mix Window
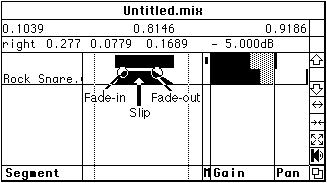
A mix window has much in common with a view window. It has an event band and a numerical display of the position of the cursors. In between these are five rectangular regions side by side. The leftmost contains the names of sound segments to be mixed. The second contains graphical representations of sound segments. The third contains a mute switch. The fourth has faders for setting the gain of the sound segment. The fifth (only in stereo mixes) contains a pan pot. Finally, you will see a scroll bar for scrolling through the mix cue sheet. To scroll along the horizontal time axis, you will use the cursors and zoom and pan operations, as you did for file windows.
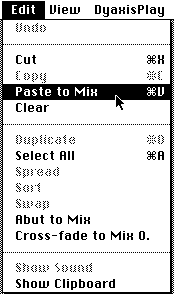
Select a segment of sound in a view window. Now select Paste To Mix in the Edit menu to send this segment to the mix cue sheet. If you have only one mix window displayed, the segment is automatically sent to this window. When you have more than one mix window, the mouse cursor changes from an arrow to a cross-hair. Move the cursor to a mix window and click the mouse button. The indicated mix window becomes the active window and the segment will be pasted there. A pasted segment appears, like the horizontal line below:
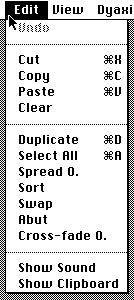
Horizontal OrientationYou may be wondering why mix windows are displayed horizontally when mixing consoles and film cue sheets are laid out vertically. Here are two reasons for the choice: * The Macintosh screen is wider than it is high * Horizontal mouse movements are faster, more comfortable and more accurate Moving SegmentsManipulate blocks in the graphics rectangle to position sound segments in the mix script and define fade-in and fade-out points. Click and drag somewhere in the middle of a block to change the position of a segment. Click and drag one of the upper corners to change a fade-in or fade-out time. These blocks are sometimes grey and sometimes black. Grey is used to show you that parts of a sound segment lie outside the mix window. Segment Position DisplayA numerical display of the currently selected sound segment is maintained in a line below the cursor position information. Clicking the mouse in this box causes the display to cycle through information on the left and right channels of stereo segments. View and Mix LinkReturn to the file window containing a sound segment you sent to a mix window. When you change a segment using the cursors, the size of the box in all mix windows in which this segment appears, also changes. This means that you can choose a completely different segment of sound without disturbing your decision about where the sound should appear in the mix. LockThe power of the view and mix linking also presents a danger: you may accidentally change a segment which you were happy with. Use Lock in the View menu to lock the cursors of a view window. For locked windows the View menu contains the function Unlock. Mix EditingSegments may be selected by clicking their names. To select more than one segment, hold down the shift key while selecting with the mouse. You can then edit segments using the standard functions of the Edit menu, i.e. Cut , Paste, Copy and Clear.
Cut segments are pasted to a Clipboard mix window, which may be hidden or shown using the bottom item of the Edit menu. The information in this clipboard is not saved on disk. The Edit menu contains many useful operations to manipulate the position and fades of selected sound segments. The Abut function places segments one after the other. This function can also be requested directly from the To Mix; button in the Open dialog box. You can use this to create play lists. CrossFade overlaps consecutive fade-out and fade-in points to create a smooth transition from one sound to another. The amount of overlap is specified with CrossFade Time in the Options menu. Sort All sorts the segment list into time order. Spread spaces segments out by a factor of time specified with Spread Time in the Options menu. This is useful for echo and reverberation effects. Processing and SynthesisEnvelopes
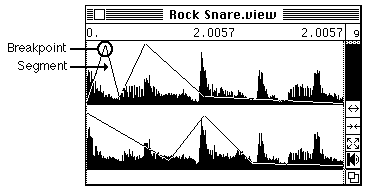
Use Envelope in the View menu to create a linear breakpoint envelope function for modifying the amplitude envelope of a sound segment. The first, 0 amplitude segment starts at the left cursor and extends to the right cursor. Click the mouse near a breakpoint to move it around. Create new breakpoints by clicking near the center of a line segment between breakpoints. Points are deleted by hitting the delete key while dragging a breakpoint. When you move the left cursor, the envelope follows. This is so you can set up the shape you want and then choose where you want it to be applied.
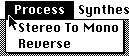
Use Save Selection As in the File menu to create a new file with the superimposed envelope. Use either envelopes or edits, but not both in the same window. The computations are performed in memory, so use them on short segments of a few seconds or so. Signal ProcessingSelect items in the Process menu to invoke signal processing functions on a selected sound segment in a view window. True to the principle that sounds are never destroyed, these operations create a new file containing the processed segment. Each operation presents you with a dialog box to enter parameters required for computations. In all cases you define the name of the new processed file.
The Process menu will expand as new functions are added. This
version of MacMix has Stereo To Mono, which quickly mixes down
stereo material to mono, and Reverse, which reverses the samples in a
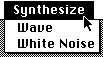
sound, creating the standard tape playing backwards effect. The Synthesize menu will also expand as new functions are added.
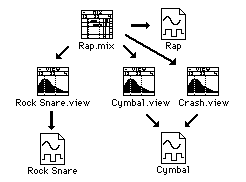
The Make Wave function can be used for creating simple test signals: sine, square, sawtooth waves and silence. White Noise synthesizes white noise. Saving View and Mix WindowsSave and Save AsUse the Save and Save As functions of the File menu to save a permanent record of mix and view windows. Saved work can be restored using the Open function. It is good practice to regularly save important work from time to time, in case you make a mistake or the system fails. This diagram illustrates the different types of files MacMix creates and how they relate to each other.
Raw sound is represented by icons with a sine and square wave. A sound can be viewed using any number of view windows (e.g. Cymbal.view and Crash.view). A view file contains a description of the position of the cursors, which define a segment, and all the other information necessary to recreate a view window. A mix file contains a description of all the view files required to create the mix output file. Referenced SoundsBe careful when opening stored view or mix windows. The information stored is a description of the view and mix windows and the sound files they refer to. MacMix assumes these sound files are available and have not changed. If you do change thesm, the results of mixes will be hard to predict.
Do not change the name of sound files referenced by mix or view windows. You can move files to other folders, but you have to move any referencing mix or view windows with them. Deleting, Printing and QuittingDeleting FilesSelect Delete in the File menu to remove files on the disk. This is especially useful when you run out of space to record sounds or create mixes as you can remove unwanted material without leaving MacMix. PrintingThe standard Macintosh printing functions are available in the File menu. MacMix prints the whole screen. Leaving MacMixSelect Quit in the File menu to exit from MacMix. If you have not saved your work, you will be prompted to do so before it is lost. Options
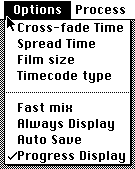
The first four items in this menu allow you to select cross-fade time, spread time, film size and timecode type respectively. Fast MixUse Fast Mix in the Options menu, when your mix involves many elements which are abutted or which overlap in time by a small amount. In this mode, MacMix only mixes what needs mixing, leaving the Dyaxis convertors to edit unmixed material as required.
Always DisplayAfter you have record many minutes of sound, you often will not want to wait for the Make Permanent Display to finish. If Always Display is checked, MacMix will always create a waveform display. This may take from 10-30 seconds depending on the width of the view window. Auto SaveWhen you close mix and view windows or leave MacMix, you will be asked whether you want to save any windows which have changed since the last time they were saved. If you find these questions irritating, select Auto Save in the Options menu. MacMix will assume that you always want windows saved. Progress DisplayIf this option is checked, progress displays appear on any long computations to give you an idea of how processing is progressing and an estimate of how long you will have to wait for completion. Performance Tips$ The easiest way to speed up performance of your system is by buying more hardware or software. Some possibilities are described in Appendix C.
You can also work faster by using the command key equivalents described in Appendix B.
Hz In applications such as speech, where bandwidth requirements are reduced, you will find that working at lower sample rates offers many advantages. You will be able to store more sound with the disk space you have. Signal processing operations will work faster as there is less information to process. However, you will hear surprising results if you mix sounds with different sampling rates.
1/2 Monophonic sounds will be processed twice as fast as and take up half the space of stereo sounds.
The mix window allows you to mix large projects in small sections. You can also benefit by using several different mix windows to create sub-mixes which can be combined in a final mix window.
Fast MixIf you are using the mix window to assemble play lists, i.e. there is little overlap between segments, the Fast Mix mode will be considerably faster. This is because MacMix does not copy sounds to the mix output file unless they have to be mixed. Show SoundMacMix screens can easily become cluttered with windows. To avoid this, close file windows which are not immediately useful. Use Show Sound in the Edit menu to bring these windows back. Show Sound operates on all selected sound segments in the current mix window. If a window exists for a sound segment, it is brought to the top. If a window does not exist, one is created and brought to the top. Disk SpaceSometimes the Record dialog box tells you there is space left on the disk, but you are unable to use it. This occurs when the disk is fragmented. Remember to backup your disks and turn off the ram cache before using this software Dyaxis requires files to be stored as contiguous sectors on the disk. It is possible for the disk to become fragmented, which means that you may not have a contiguous region of the disk large enough to create a sound. When this occurs you have to either remove files or use a program such as DiskExpress(TM) to rearrange the disk. DiskExpress(TM) is available from: ALSoft Inc PO Box 927 Spring, Texas 77383-0927 Appendix A: Information SourcesBooksAudio Production Techniques for Video, David Miles Huber, Howard W. Sams & Co. , 4300 West 62nd Street, Indianopolis, IN 46268
Foundations of Computer Music, edited by Curtis Roads and John Strawn, The MIT Press, Cambridge, Massachusetts
Handbook for Sound Engineers, edited by Glen Ballou, Howard W. Sams & Co. , 4300 West 62nd Street, Indianopolis, IN 46268
Principles of Digital Audio, Ken C. Pohlmann, Howard W. Sams & Co. , 4300 West 62nd Street, Indianopolis, IN 46268
Magazines and JournalsComputer Music Journal, The MIT Press, 28 Carleton Street, Cambridge, Massachusetts 02142
Electronic Musician, 2608 Ninth Street, Berkeley, CA94710
Journal of the Audio Engineering Society, Audio Engineering Society, 60 East 42nd Street, New York, NY 10165-0075
Keyboard Magazine, GPI Publications, 20085 Stevens Creek, Cupertino, CA95014
Mix, Mix Publications Inc. , 2608 Ninth Street, Berkeley, CA 94710
Recording Engineer/Producer, Intertec Publishing Inc. , 9221 Quivira Road, PO Box 12901, Overland Park, KS 66212-9981 Appendix B: Keyboard ShortcutsCommand Key Equivalents
A Select All C Copy E Envelope H Help I Get Information Q Quit R Record S Save V Paste X Cut . Abort
Pallet FunctionsA new window is created if the shift key is down during click of these buttons:
Pan Left and Right
Zoom In
Zoom Out
If the shift key is down when clicking in the play icon, a cut is performed. If the Apple key is down the whole window is played:
Play Appendix C: AcceleratorsThe following companies supply accelerators for Macintosh computers:
General Computer from General Computer dealers: (800) 854 9737 Levco 6160 Lusk Blvd Suite C-203 San Diego, CA 92121 (619) 457 2011 MacMemory 2480 North First Street San Jose, CA 95131 (408) 922 0140 You can expect any of the 68020-based accelerators to speed up computations by a factor of at least four Network Specialties 1485 Bayshore Blvd. , Suite 459 San Francisco, CA 94124 Novy Systems 69 Ravenwood Ct. Ormond Beach, FL32074 (904) 427 2358
Radius 1050 Ease Duane Avenue, Suite F Sunnyvale, CA 94086 (408) 732 1010 Ryad 2521-F N. Grand Avenue, #950 Santa Ana, CA 92701 (714) 558 0662 |