Kotrak
Series: alt.ctrl activities; builds on Gametrak and Koto; Spatial arrangement
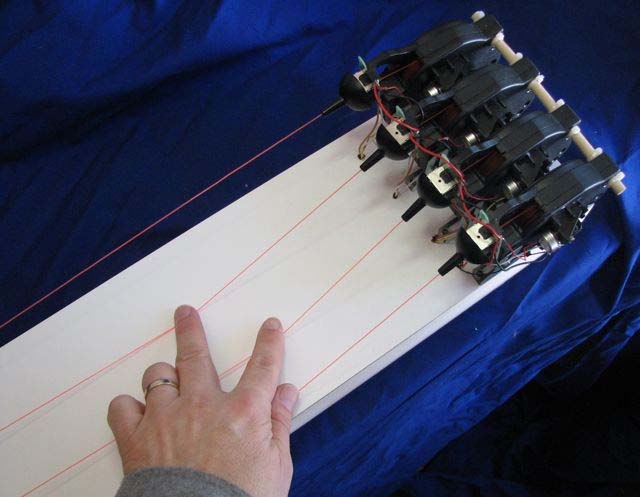
A Gametrak's two joysticks are a fixed distance apart, which is too constraining for some instruments. Add a second Gametrak, or take one apart and reassemble its two sensors at the spacing you need. The Kotrak does this to capture the string pressing and pulling gestures of koto players.
Materials
| Item | Amazon | eBay |
|---|---|---|
| Two Gametrak controllers, for four tethers (the paper's photograph shows four) | search | |
| A long board | ||
| A computer with Max/MSP or Pd |
Tools
- Screwdriver
- Tools not yet listed.
Skills
- Skills not yet listed.
Instructions
- Open the Gametraks and take out each tether sensor, its reel and joystick, keeping its wiring. Keep hold of each tether: it is under spring tension, and snaps back into its reel if released.
- Mount the sensors side by side at one end of the long board, at the spacing of a koto's strings.
- Run the tethers along the board like strings, and anchor their ends at the far end.
- Map each string's readings to sound: pressing a string or pulling it changes its tether's angles and extension.
Variations
- Variations not yet written.
Related resources
- Musical Applications and Design Techniques for the Gametrak Tethered Spatial Position Controller, Freed and others, SMC 2009, section 4.8
- Koto (Wikipedia)
Coding Prompt Build Block
A prompt to give a coding assistant, to start the code for this activity. Copy the box, answer its questions about your board and pins, and test what comes back on the bench before you rely on it.
I am building "Kotrak", the activity at https://adrianfreed.com/kotrak.html.
Write a Max or Pd patch, or a program, for four tether sensors from two Gametraks, remounted in a row and run along a board like koto strings. The two Gametraks are identical devices: let me tell them apart by pulling a string.
Calibrate each string's rest position. Map each string's readings to sound: pressing a string or pulling it changes its tether's angles and extension.
Libraries to explore:
- o.io.gametrak (CNMAT MMJ Depot): CNMAT's Max patch for the Gametrak: it opens the device and outputs /left/x, /left/y, /left/z, /right/x, /right/y, /right/z and /footswitch, the angles scaled from -1 to 1 and the extensions from 0 to 1 (https://github.com/CNMAT/CNMAT-MMJ-Depot/tree/master/patchers/io/gametrak)
- odot (CNMAT): the o. objects for Max and Pd that o.io.gametrak is built from, with OSC bundles as their data type (https://github.com/CNMAT/CNMAT-odot)
- Max hi object: reads human interface devices, such as game controllers, in Max (https://docs.cycling74.com/reference/hi/)
- Pd hid external: reads USB HID devices, such as joysticks and gamepads, in Pd, on GNU/Linux and macOS (https://github.com/pd-externals/hid)
Before writing anything, ask me what I am using: the board and its pins, or the software (such as Max, Pd or Python), and check its documentation for what this needs. Put the pin numbers, ranges and other settings in one block at the top, each with a comment. Say which of the libraries above you use, and why. Start with a test that shows the raw readings, so that I can check the wiring and the ranges before the rest.
This activity by Adrian Freed is licensed under Creative Commons Attribution-NonCommercial-ShareAlike 4.0 International (CC BY-NC-SA 4.0): you may share and adapt it with attribution, for non-commercial purposes such as personal projects and teaching, and you must share adaptations under the same licence. Product names and links belong to their suppliers.